Step 01
First-Time Setup Wizard
Download the current release of PrusaSlicer from the official Prusa website before you begin. This configuration page can be jarring at first, but if you need, a great resource to review this material could be online videos such as Watch YouTube Video
-
Run the WizardInstall the Prusa Slicer, like many, follow its navigation until you reach the wizard. On first startup of the wizard, you will be asked to select a printer type choose
Prusa MK4as well as0.4 mm nozzlewhich is our most common and speed is comparable to our other FDM Printers. Lastly, pickGeneric PLA. Click continue and finish the navigation -
Set the Interface ModeIn the top right of the main window, set the mode to
Advancedfor this assignment. As well as ensuring you have all previous printer profiles selected, the same as what you just selected in the wizard.
Step 02
Import Your Model
Go to File → Import → Import STL/OBJ and open your file. Alternatively, you can Drag and Drop the file into the PrusaSlicer window. Confirm the model loads at the scale and orientation you expect before moving on, if it looks tiny or huge, double check your export units were millimeters. If not, that is alright if the dimensions do not matter, feel free to use the resize tool to make the object as large as needed.
Step 03
Choose Printer & Orient Your Model
Select the printer from the Printers drop-down on the right menu that matches the machine your request will actually run on.
| Printer Profile | Build Volume (L×W×H) | Best For |
|---|---|---|
| Original Prusa i3 MK3S & MK3S+ | 240 × 200 × 210 mm | General Printing |
| Prusa MK4 | 240 × 200 × 210 mm | General Printing |
| Prusa Core One | 240 × 210 × 260 mm | Our Fastest Printer |
| Prusa XL | 350 × 350 × 350 mm | Large-format models |
Once your printer is selected, use the rotate tool on the left toolbar to orient your model in its best possible printing position. Good orientation means fewer supports, a stronger part, and less chance of failure.
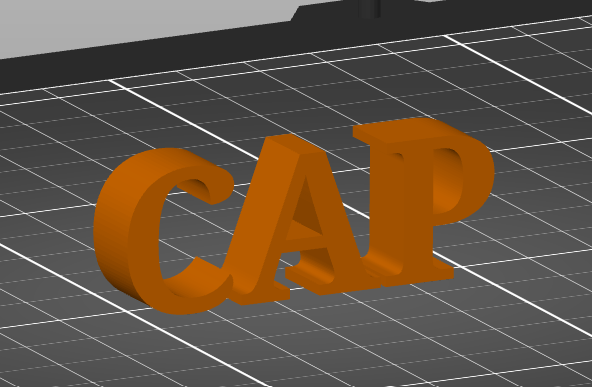
Poor Orientation
This model features strong curvature and steep overhangs from the Text. The C has a massive overhang, and the P, while it could print, could be improved.
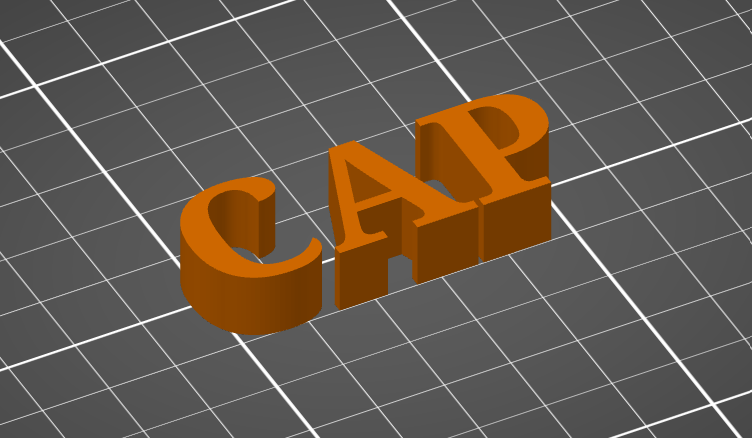
Good Orientation
Simply rotating the model to rest on its largest flat face, minimizing overhangs and maximizing bed contact, the print is more likely to succeed, and the surface finish will be cleaner. It is recommended to also test to see if a Brim appears. The Brim is useful for seeing if the entire bottom layer is attached to the build plate correctly.
Orientation Guidance
What to Look For
There's no single rule that fits every model, but before you slice, check for these three things: your model sits on its widest flat surface where possible, overhangs beyond roughly 45° are minimized or reoriented, and any thin or fragile features are supported by the bed rather than floating in open space.
Step 04
Recommended Settings
Confirm the mode in the top right is still set to Simple, then apply the following settings for this assignment:
Print Settings
These are default teaching settings, not necessarily what every real print request needs. This training portion is just to familiarize you with the slicing process.
Our printer settings are different than the default PrusaSlicer 0.20mm settings, in general our printer lab runs a modified, slowed down to ensure that your prints are printed once and not multiple times due to print errors caused from slicer settings. If you are interested in setting what we had changed, please ask our Maintenance Student who works actively makes changes to our CAP Profiles.
Step 05
Slice & Review Layers
Select Slice and scroll through the layers generated by the software. Check to see if any errors pop up on the bottom right, to see if there are any issues with your model or settings, this could be g-code crossing error, or overhang error. If you have any questions, please discuss with a Lab worker and they will be able to help explain any errors.
Check the bottom-right estimate for grams of filament and print time before moving on. If the time or material estimate looks far larger than expected, revisit your orientation and supports settings from Step 03. More than not, the infill is what takes the most time, consider lowering it at most down to 5%. Practically, 1% is sometimes ok, its best to avoid it unless you know for a fact that it will not carry any form of weight load if it is a decoration type model.
Step 06
Save & Export G-code
- Export your sliced file as
.gcode. - Name the file clearly, the name of the object is often best, followed with your name.
- Double check the exported file corresponds to the printer profile selected in Step 03. At this point, you should be able to print the file that you are wanting, you are free to have a lab worker review your file.