Step 01
Material & Power On
Size your material, log in to the station computer, and turn on the machine and compressed air.
-
Cut Your Material to Size PDF p. 1Cut your material to 18” x 32” or smaller for stations A, B, and C, or 18” x 24” or smaller for station D.
- Log In to the Station Computer PDF p. 1Log in with your BSU credentials. You may also need to log in to Adobe Cloud to access Illustrator.
- Turn On the Laser and Compressed Air PDF p. 1If the laser is not already on, follow the instructions for your station:Stations A and B: Turn on the wall switch behind the computer desk. You will hear the cooling fan and compressed air assist turn on.Stations C and D: Open the Universal Laser Control Panel (UCP) using the desktop or lower-right icon, then click its Power button. Alternatively, use the touch panel at the front-right corner of the laser. Then turn on compressed air: the switch for C is directly behind Laser C; the switch for D is behind the computer desk.
-
Ensure Ventilation Systems, if Any, Are OnCutting materials often releases small traces of smoke; laser cutters often have ventilation systems to ensure you aren't breathing anything you might not want to.
Step 02
Starting a New Document
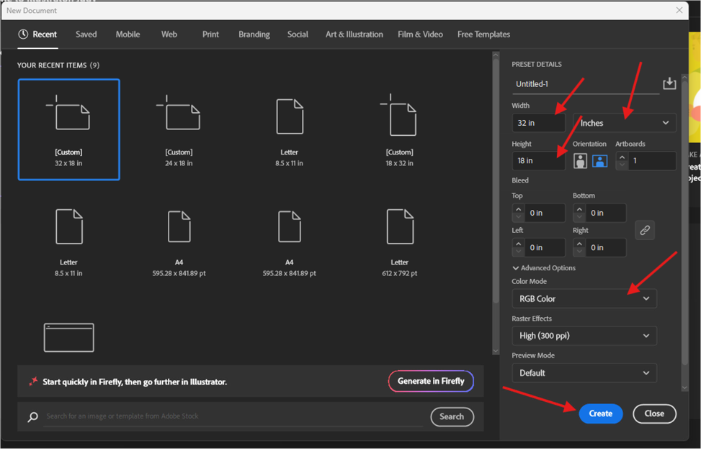
To start a new document on a Laser Lab computer, open Illustrator and create a document with the following settings:
-
Open a New File PDF p. 1Open Illustrator. Choose File and click New…
-
Set the Units PDF p. 1Set the Units to Inches.
-
Set the Width & Height PDF p. 1Set the Width to 32” for A, B, and C or 24” for D. Set the Height to 18”.
-
Set the Color Mode PDF p. 1Set the Color Mode to RGB, then click Create.
Step 03
Opening a Previously Created File
If you are opening a previously created file, confirm the color mode, units, and artboard size before you go any further.
-
Check the Document Color Mode PDF p. 2Under File->Document Color Mode make sure RGB Color is set.
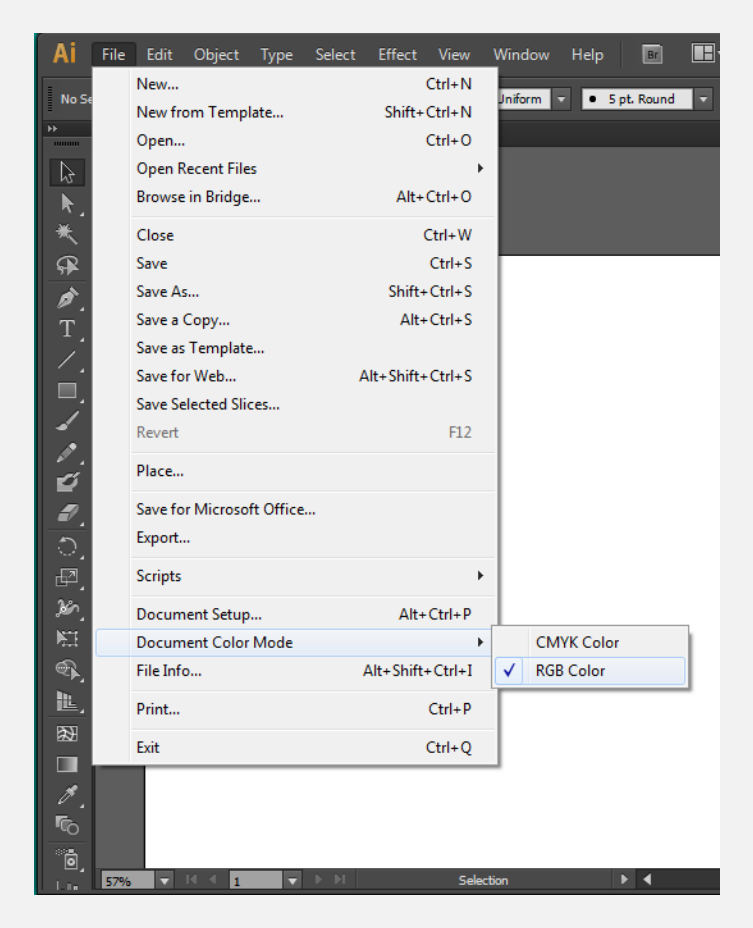 Figure 2: File->Document Color Mode->RGB Color.
 -
Check the Units PDF p. 3Choose File->Document Setup and make sure the Units are set to Inches.
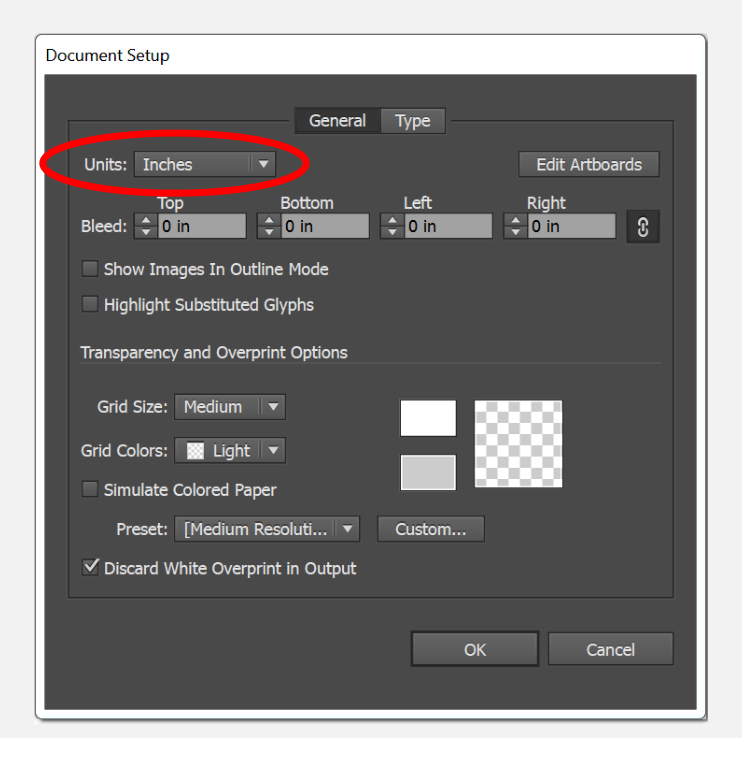 Figure 3: Document Setup, Units set to Inches.
 -
Check the Artboard Size PDF p. 3Choose Window->Artboards. Click the icon to the right of your artboard (see below). Make sure your Artboard Width is set to 32” for A, B, and C (or 24” for D) and Height is set to 18”.
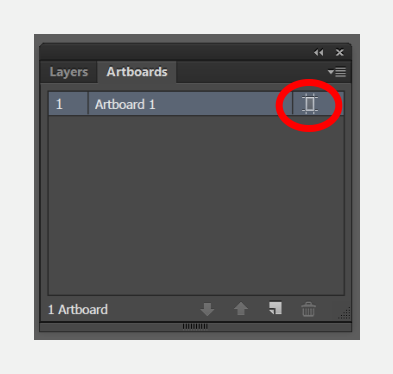 Figure 4: Window->Artboards, click the icon to the right of your artboard.
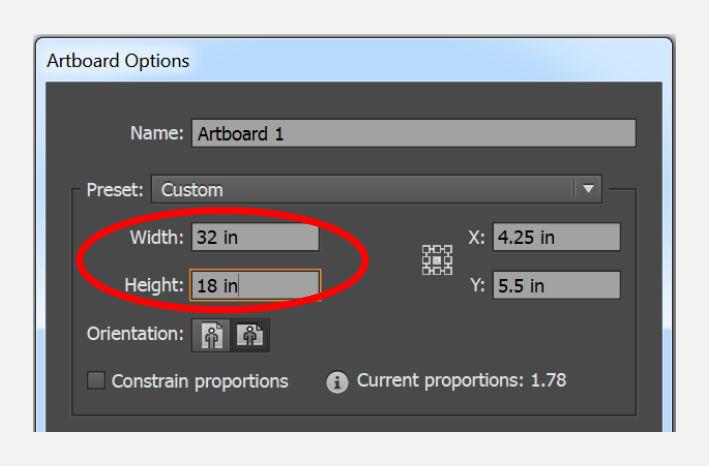 Figure 5: Artboard Options, Width 32”, Height 18”.
Step 04
Rulers, Panels & Swatches
Set your origin, open the panels you will need, and load the swatch library that drives the cut settings.
-
Turn On Rulers & Set the Origin PDF p. 4Turn on rulers by pressing Ctrl + R, or select View -> Rulers -> Show Rulers. Make sure the document origin is set correctly by dragging from the upper left corner until the crosshairs line up with the upper left corner of your artboard.
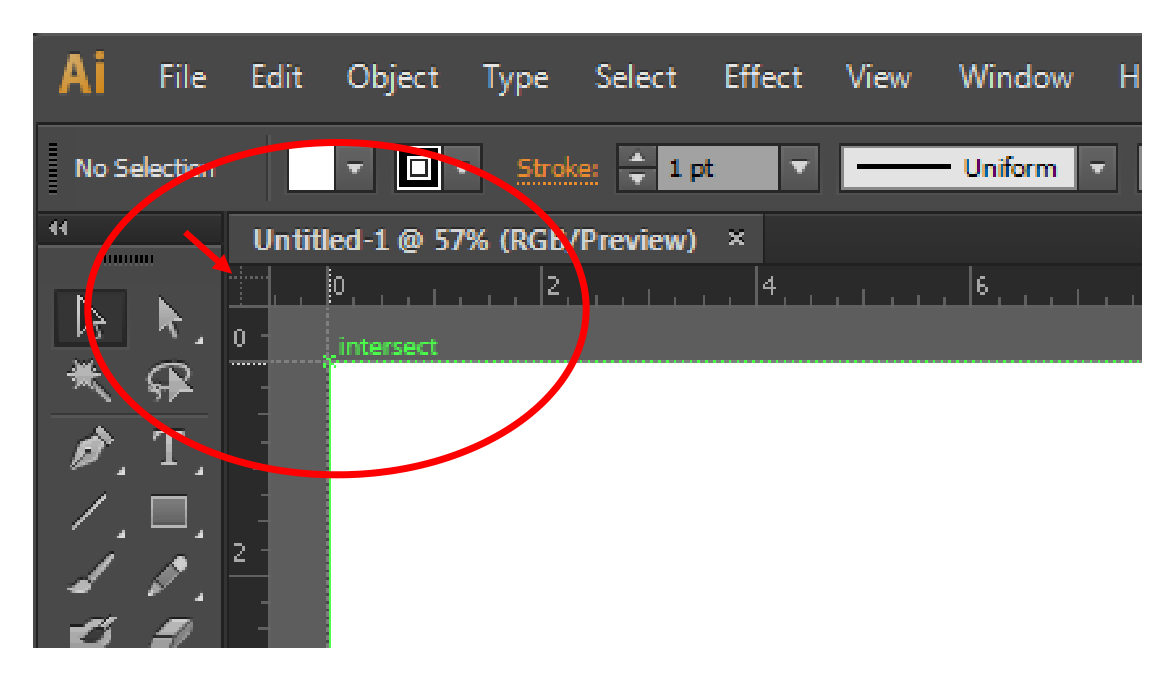 Figure 6: Drag from the upper left corner until the crosshairs line up with the artboard corner.
 -
Turn On the Panels PDF p. 5Open the Window menu and make sure Control, Tools, Color, Stroke, and Swatches are turned on.
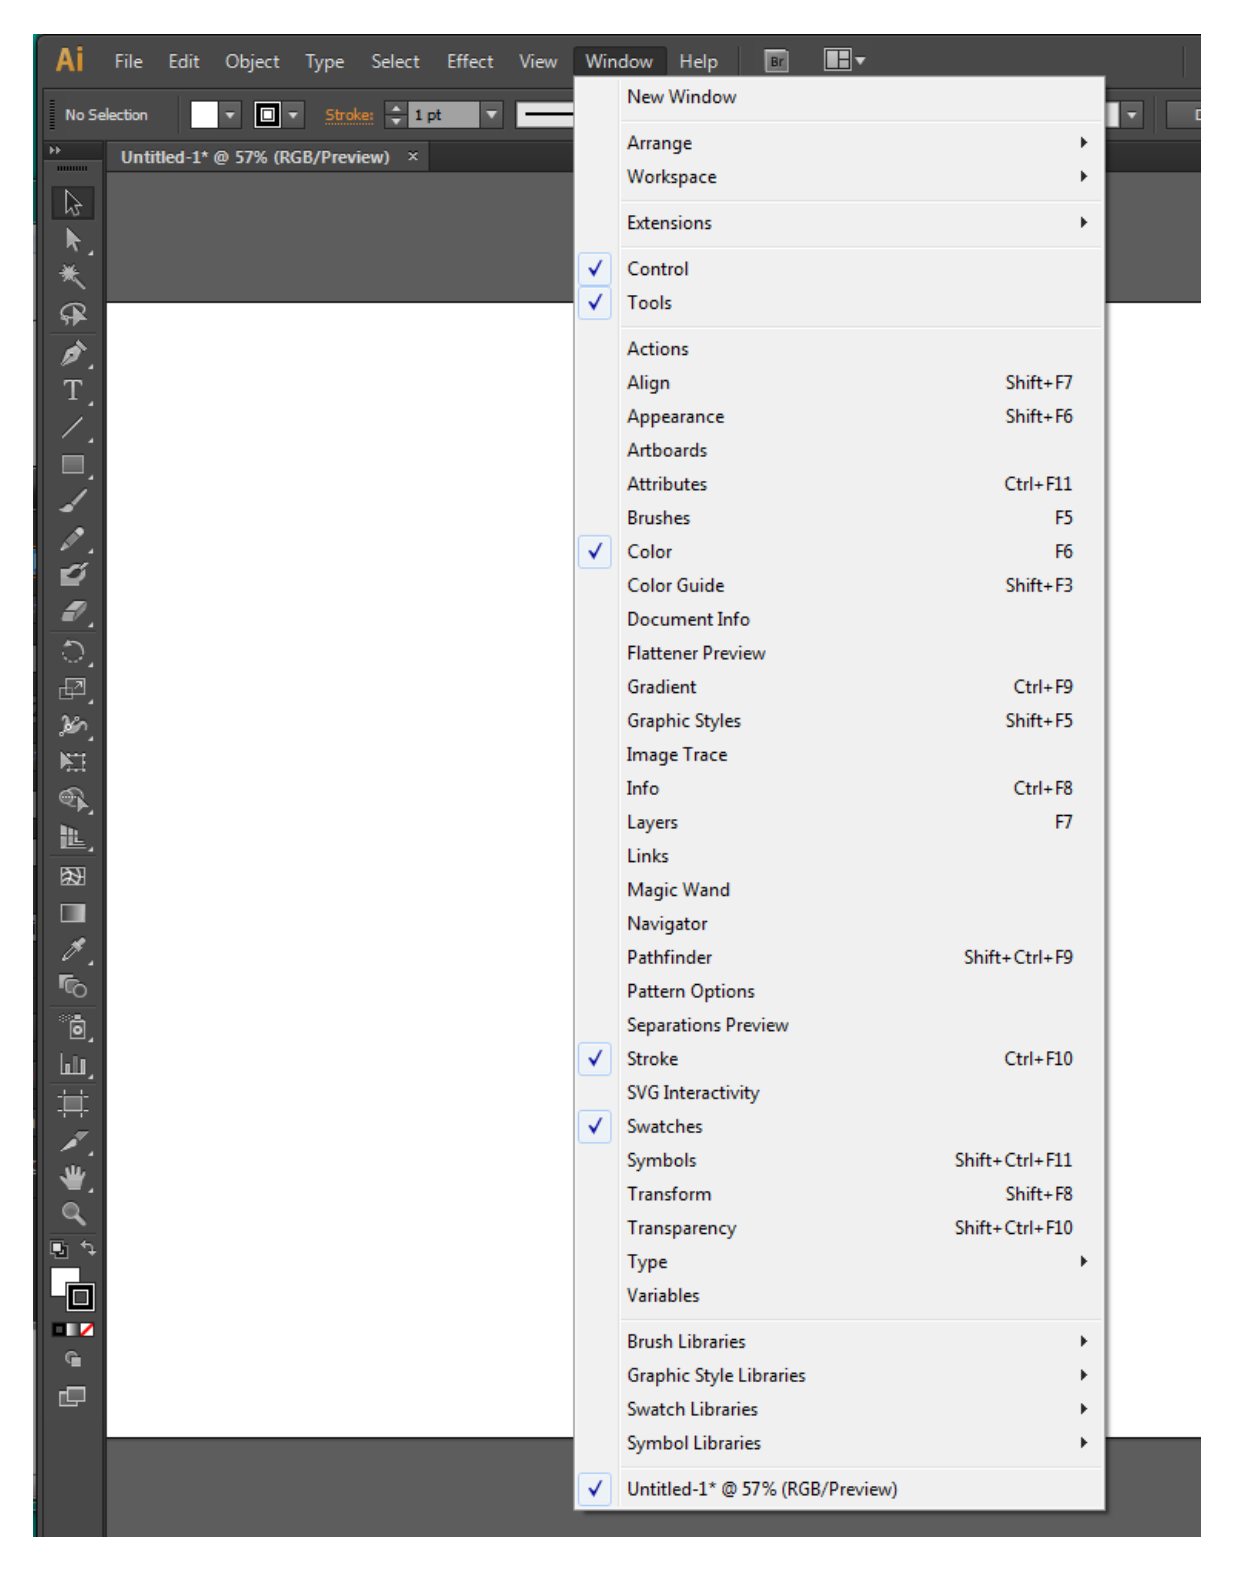 Figure 7: Window menu — Control, Tools, Color, Stroke, and Swatches turned on.
 -
Load the LASER RGB Swatch Library PDF p. 6On the Swatches panel, click the Swatch Libraries icon and select Other Library…. Open the laser RGB palette from your thumb drive, or use the palette on the station Desktop. This swatch provides the eight colors used by the laser driver.
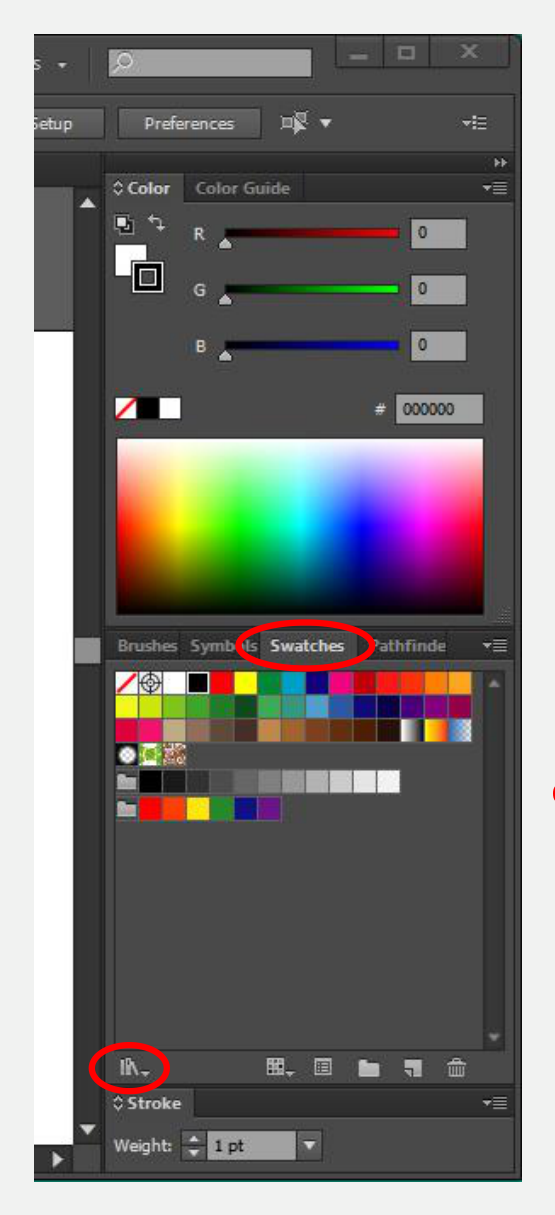 Figure 8: The Swatch Libraries icon sits in the lower left corner of the Swatches panel.
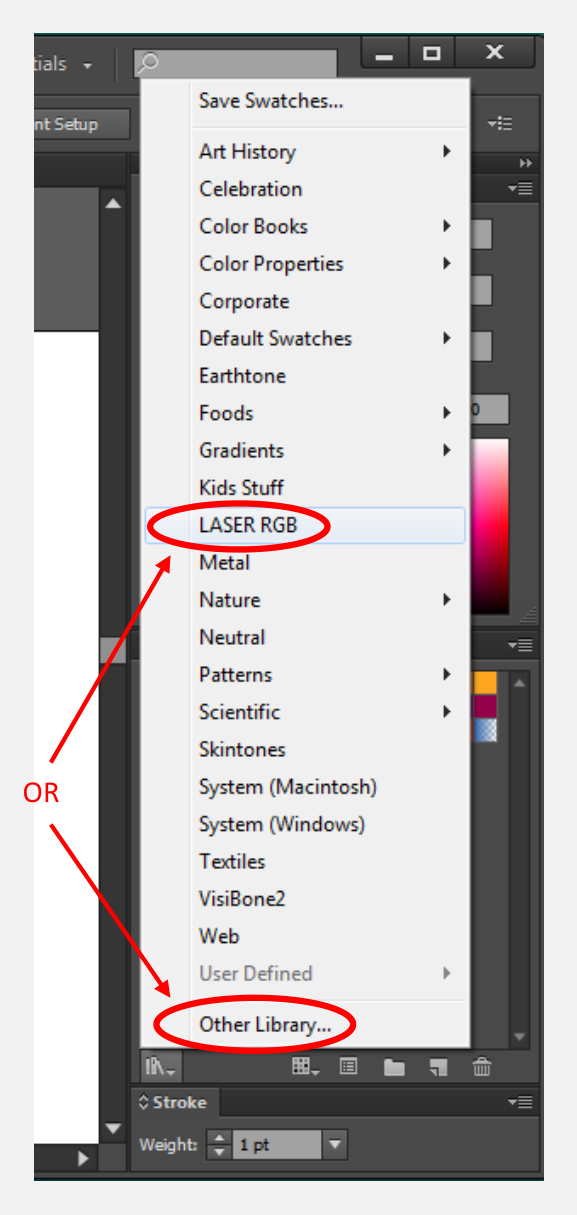 Figure 9: Use Other Library… to open the palette from your thumb drive or the station Desktop.Not on a Lab Machine? Otherwise, make sure you have downloaded the Laser RGB Swatch Library, then select Other Library, or Book Stack Icon… from the Swatch Libraries menu (see above) and select the downloaded file.
 -
Check Your Scale PDF p. 7Check to make sure you have the desired scale by comparing the size of your drawing against the rulers and the Artboard and visually inspect your file to make sure it is still drawn and laid out as you intended.
Step 05
Preparing Your Drawing
Line weight, color, and placement on the artboard are what tell the laser what to do.
-
Set Vector Line Weight PDF p. 7Make sure that any lines you intend to use for vector cuts have their line weight set to 0.01pt in the Stroke dialog box. Raster cuts can be any line weight.
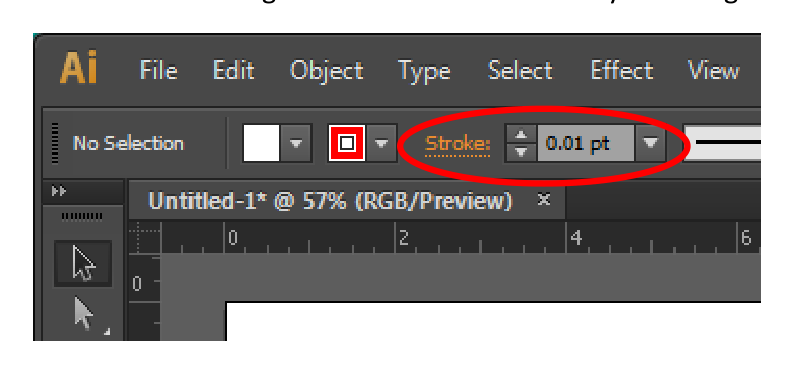 Figure 10: Vector cut lines must be set to 0.01pt in the Stroke dialog box.
 -
Assign Colors & Understand Modes PDF p. 8Assign colors from the LASER RGB swatch. The PDF recommends black for raster engraving, blue for vector scoring, and red for vector through-cuts. Set each color’s actual mode and material settings in the print driver.Raster: Engraves using left-to-right motion and calibrated pulses.Vector through-cut: Cuts completely through the material.Vector score: Produces a line without cutting the shape out.Raster/Vector: Runs a raster pass followed by a vector pass.Skip: Does not process that color.
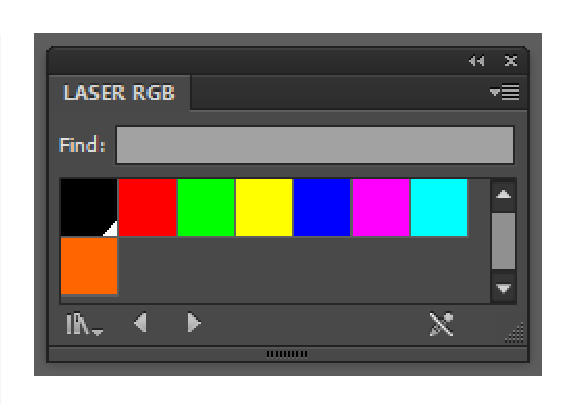 Figure 11: The eight LASER RGB colors you can assign cut values to.
 -
Place Your Design Inside the Artboard PDF p. 8The laser machine will only cut/raster the parts of the object that have been placed inside the Artboard area, a white-filled rectangle with the black border. Place the part of your design you wish to cut inside the rectangle, making sure that none of it is touching or overlapping the edges of the box.
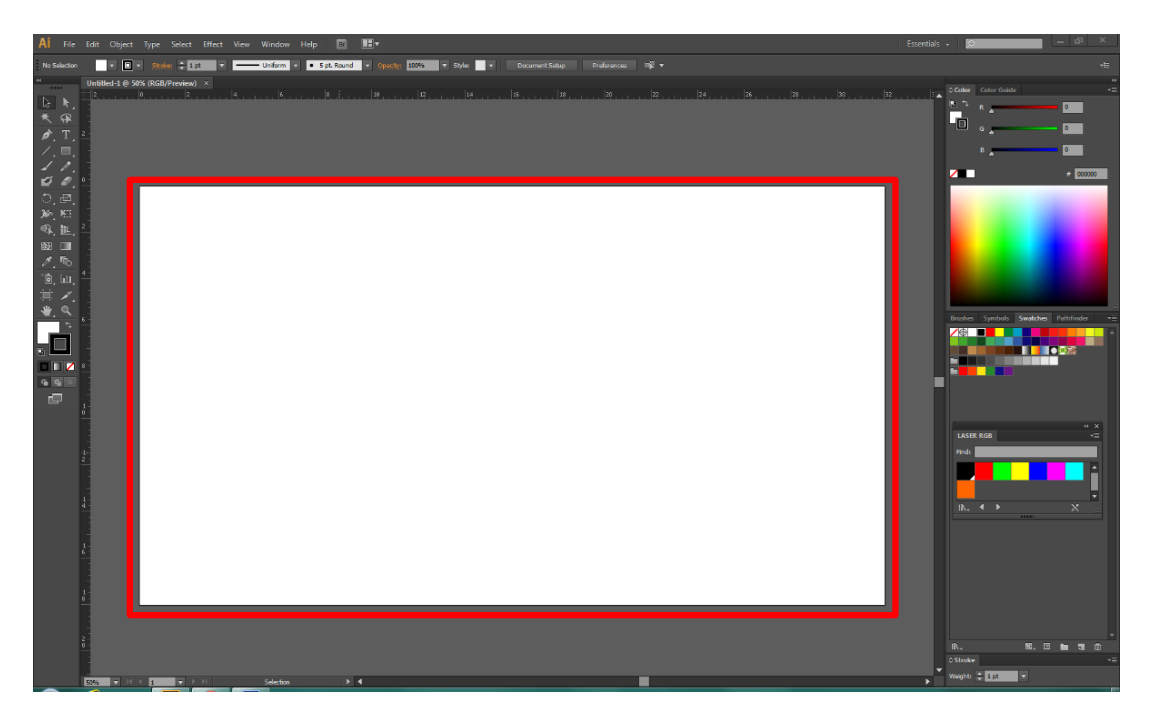 Figure 12: Only artwork inside the artboard rectangle will be cut.
Rasters First, Then Vectors
The PDF describes color order as black through orange and recommends assigning raster engraving to black so it is completed first. Use blue for vector scores and red for vector through-cuts. Complete engraving and scoring before through-cuts so loose pieces do not shift.
Step 06
Cut Settings & Printing
Cut settings live in the print driver. Pull the numbers off the sample cut card for your material and enter them color by color.
-
Find the Sample Cut Card PDF p. 9Once you have positioned the material you wish to cut, look through the materials settings box at your station, find the card that most closely matches the material you are using. Take note of specific settings on that card, and of which colors you want to assign each setting to. Materials not in the box are not approved for the lab. Prohibited materials include concrete, cement, metal of any kind, reflective materials, PVC, foam core, and vinyl.
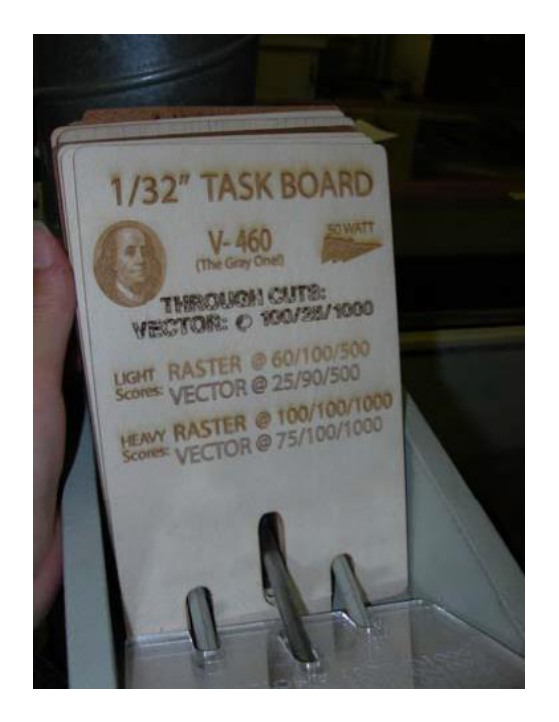 Figure 13: Sample cut cards list the power, speed, and PPI settings for each material.
 -
Open the Laser Settings PDF p. 10To access the laser settings, go to File -> Print
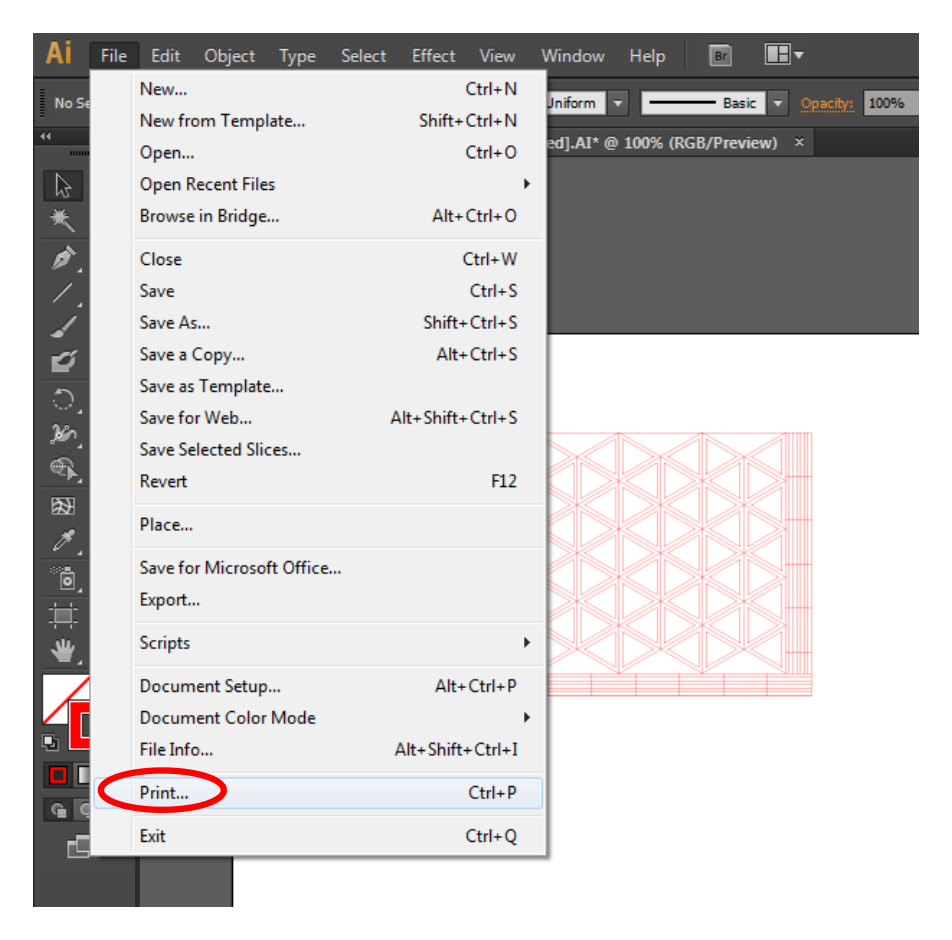 Figure 14: File -> Print opens the print dialog box.
 -
Click Setup… PDF p. 11Click Setup in the lower left corner of the Print dialog box.
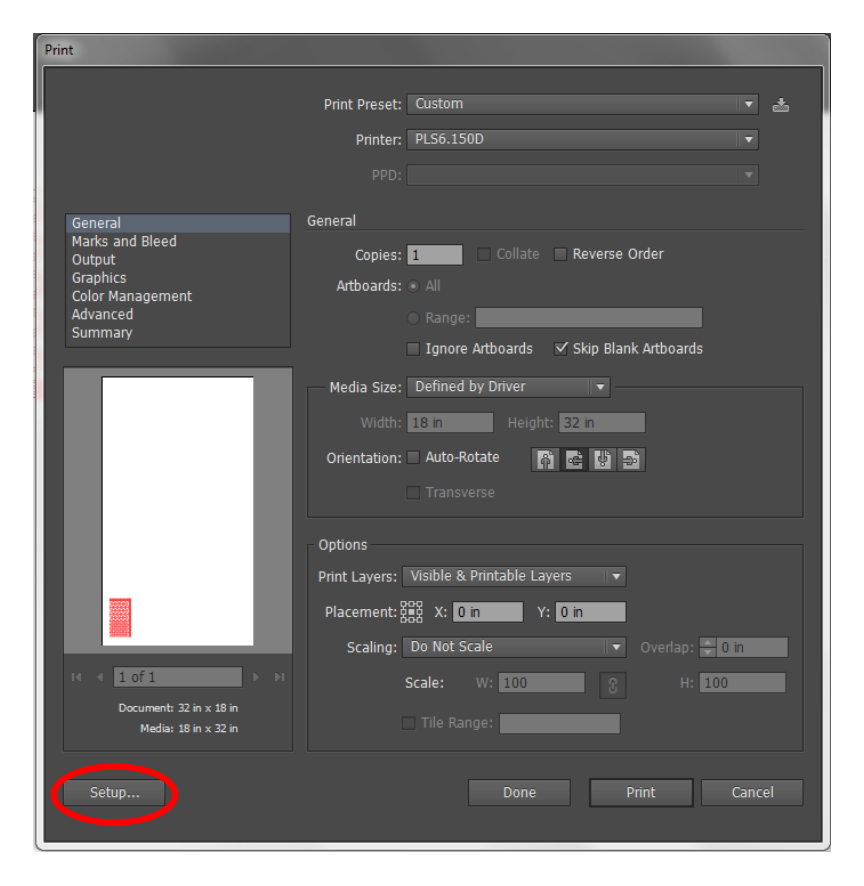 Figure 15: Setup… sits in the lower left corner of the Print dialog box.
 -
Click Preferences PDF p. 11Click Preferences when the Print Setup dialog box pops up.
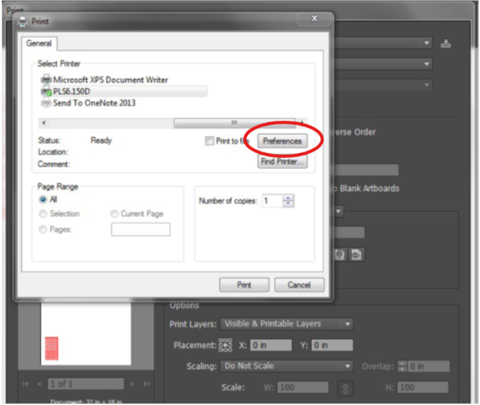 Figure 16: Click Preferences in the Print Setup dialog (PDF p. 11).
 - Choose More Settings PDF p. 12In the newer print preferences window, click More settings to open the laser driver controls.
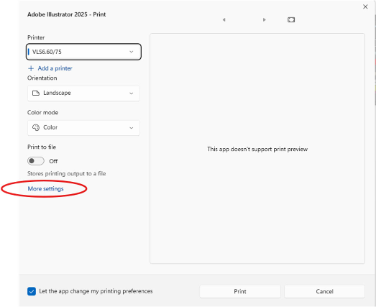 Print preferences: More settings opens the laser settings (PDF p. 12).
 -
Confirm the Laser Settings View PDF p. 12You should now be in the Laser Settings view and should see a list of the same eight colors in your LASER RGB swatch (at left).
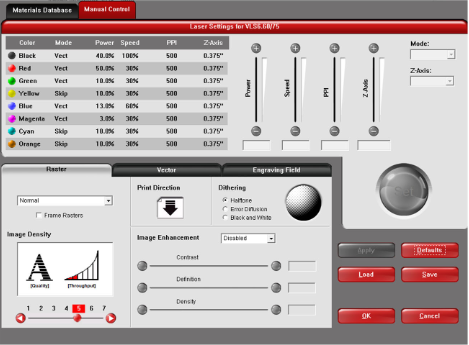 Figure 17: Laser Settings view from PDF p. 12. Enter values from your material card; the screenshot values are an example.
 -
Set Mode, Power, Speed & PPI PDF p. 13For each color you used in your document, the Mode needs to be set to Vect or Rast and the Power, Speed and PPI values need to be set according to the sample cut card for the material you are cutting.Select the first color you used in your document, then use the boxes at right to configure the cut for the lines in that color. Be sure to click the big Set button to save your changes.
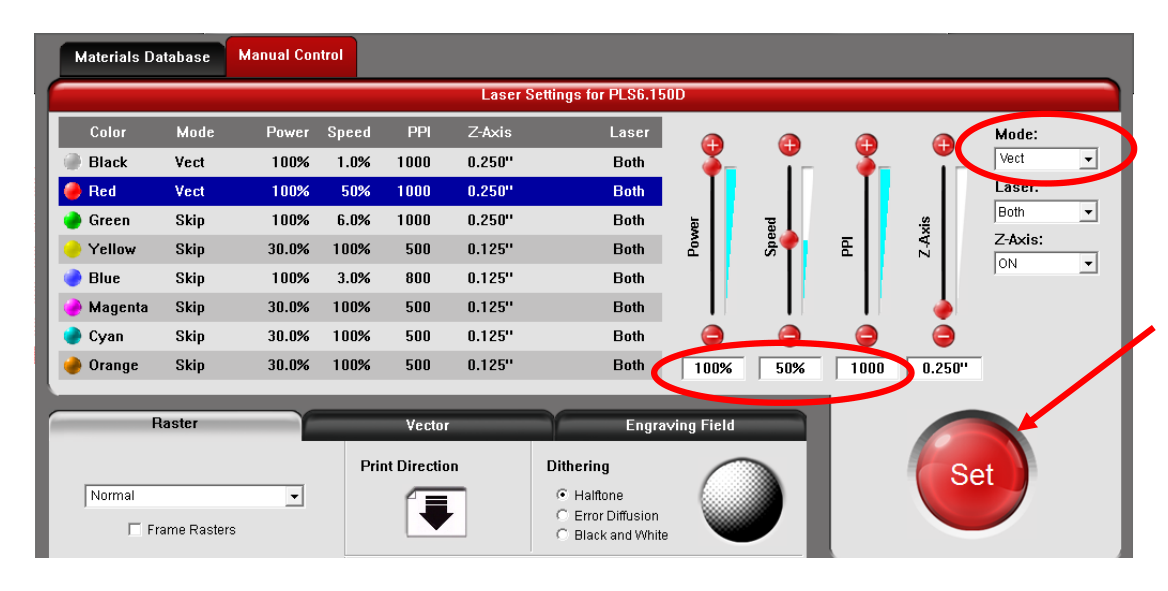 Figure 18: Configure the color, then click the big Set button to save your changes.
 -
Skip the Colors You Do Not Want to Cut PDF p. 13For each color you do NOT want to cut, make sure to set the Mode to Skip. Then click OK.
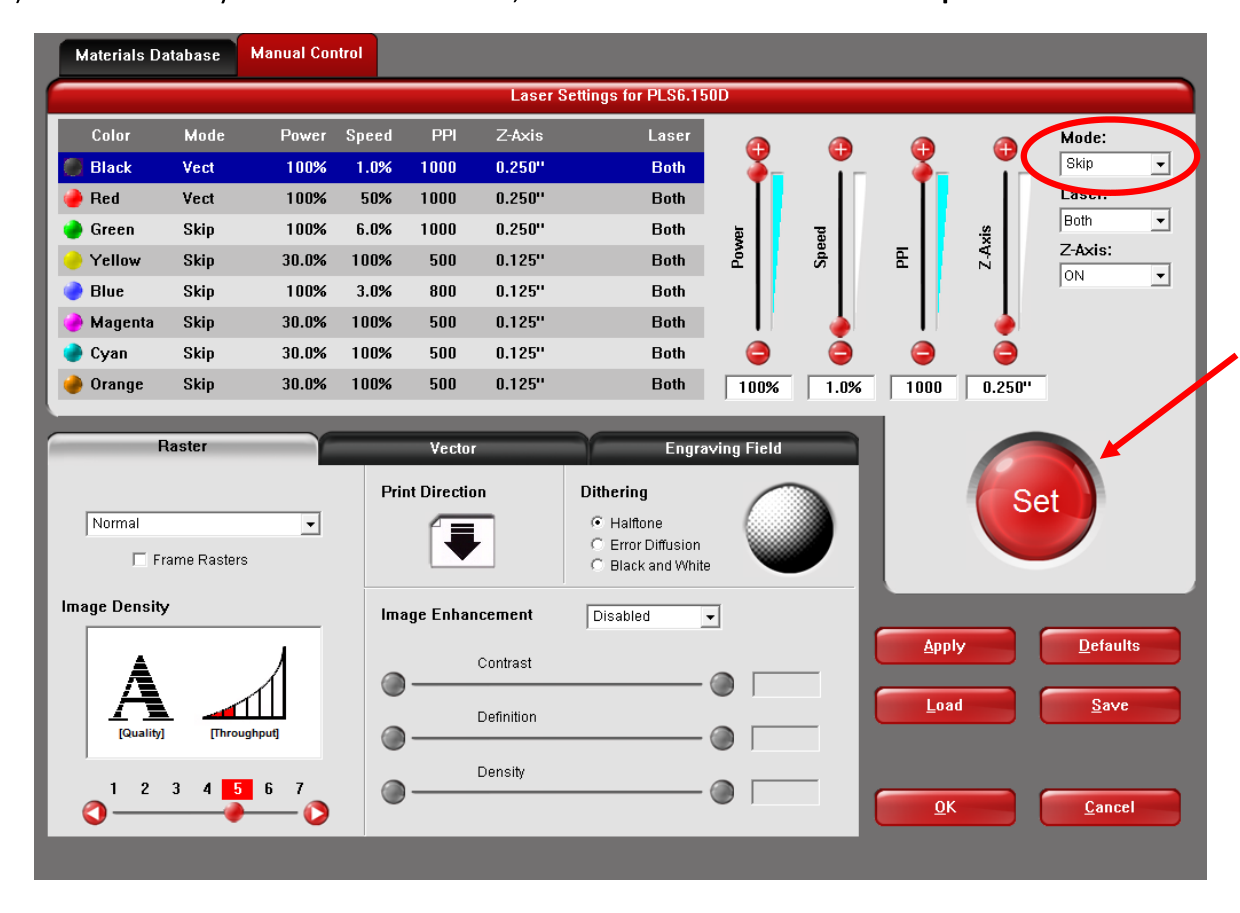 Figure 19: Unused colors must be set to Skip.
 -
Close the Print Setup Box PDF p. 14Click the Print button at the bottom of the Print Setup dialog box.
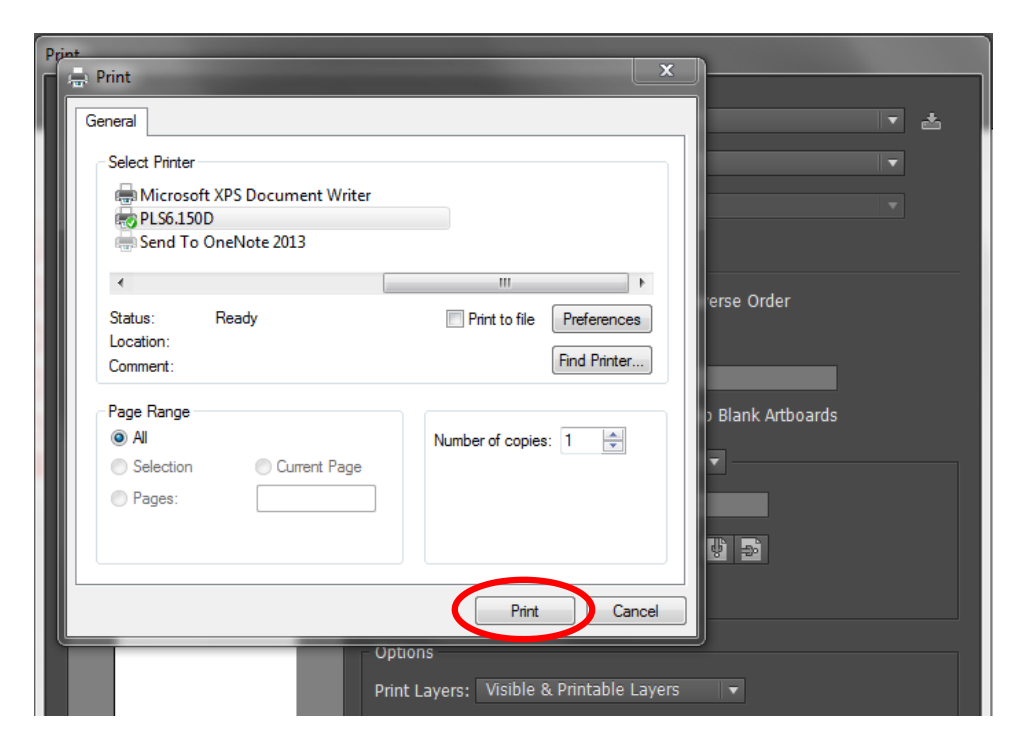 Figure 20: Click Print at the bottom of the Print Setup dialog box.
 -
Set the Media Size PDF p. 15In the Print dialog box, under Media Size, select User-Defined LANDSCAPE.
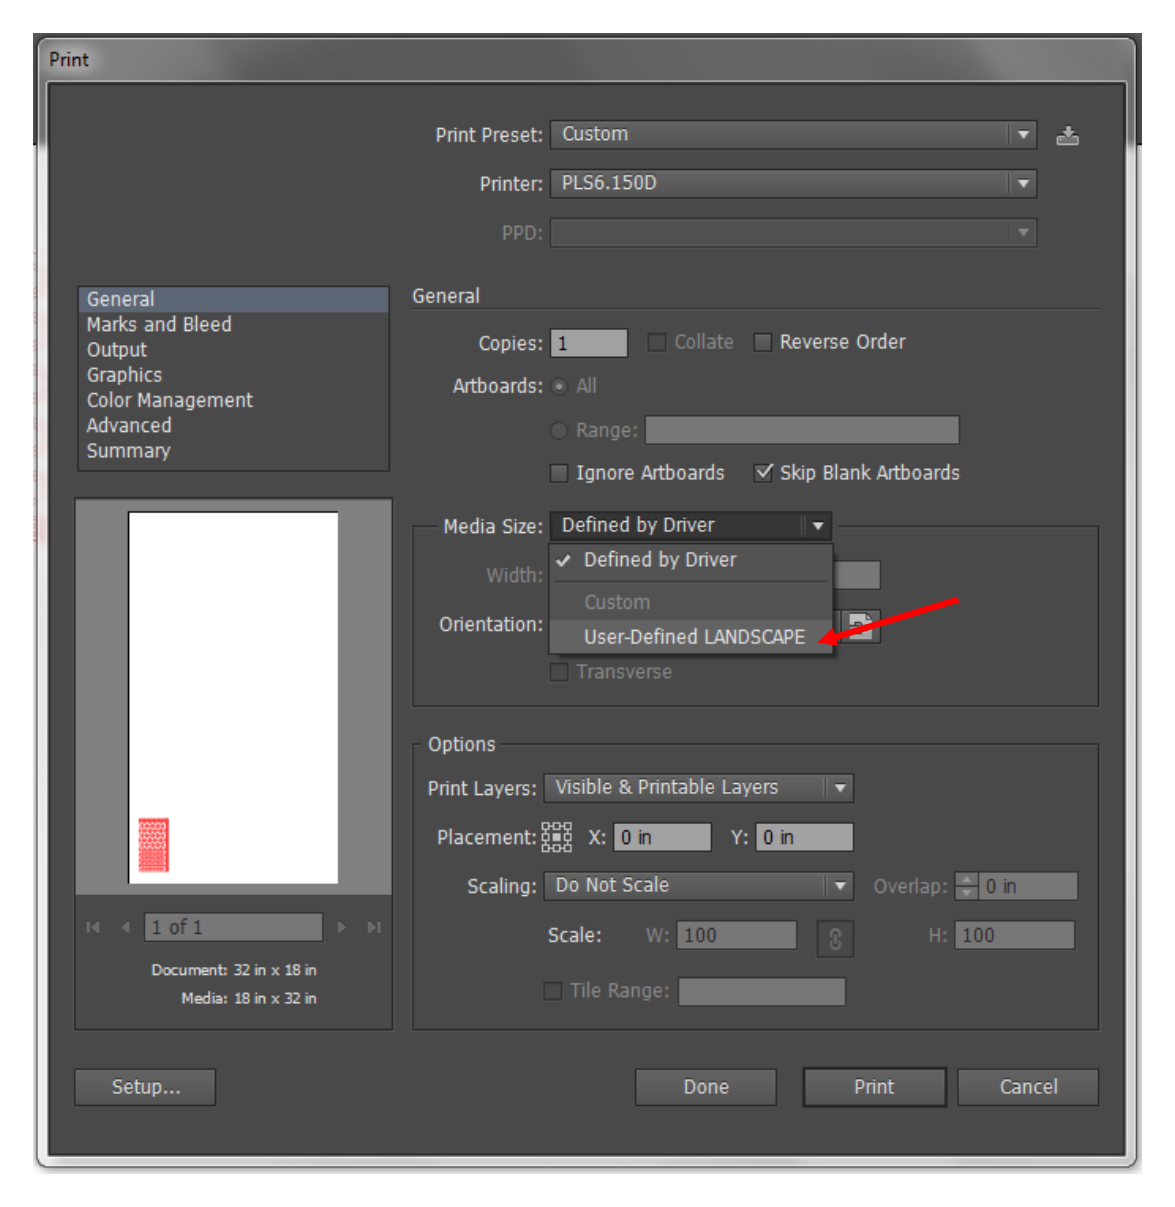 Figure 21: Media Size → User-Defined LANDSCAPE.
 -
Set the Orientation PDF p. 15Then for Orientation, click the button for portrait orientation (the first of the four). Counter-intuitive, but it fixes the orientation.
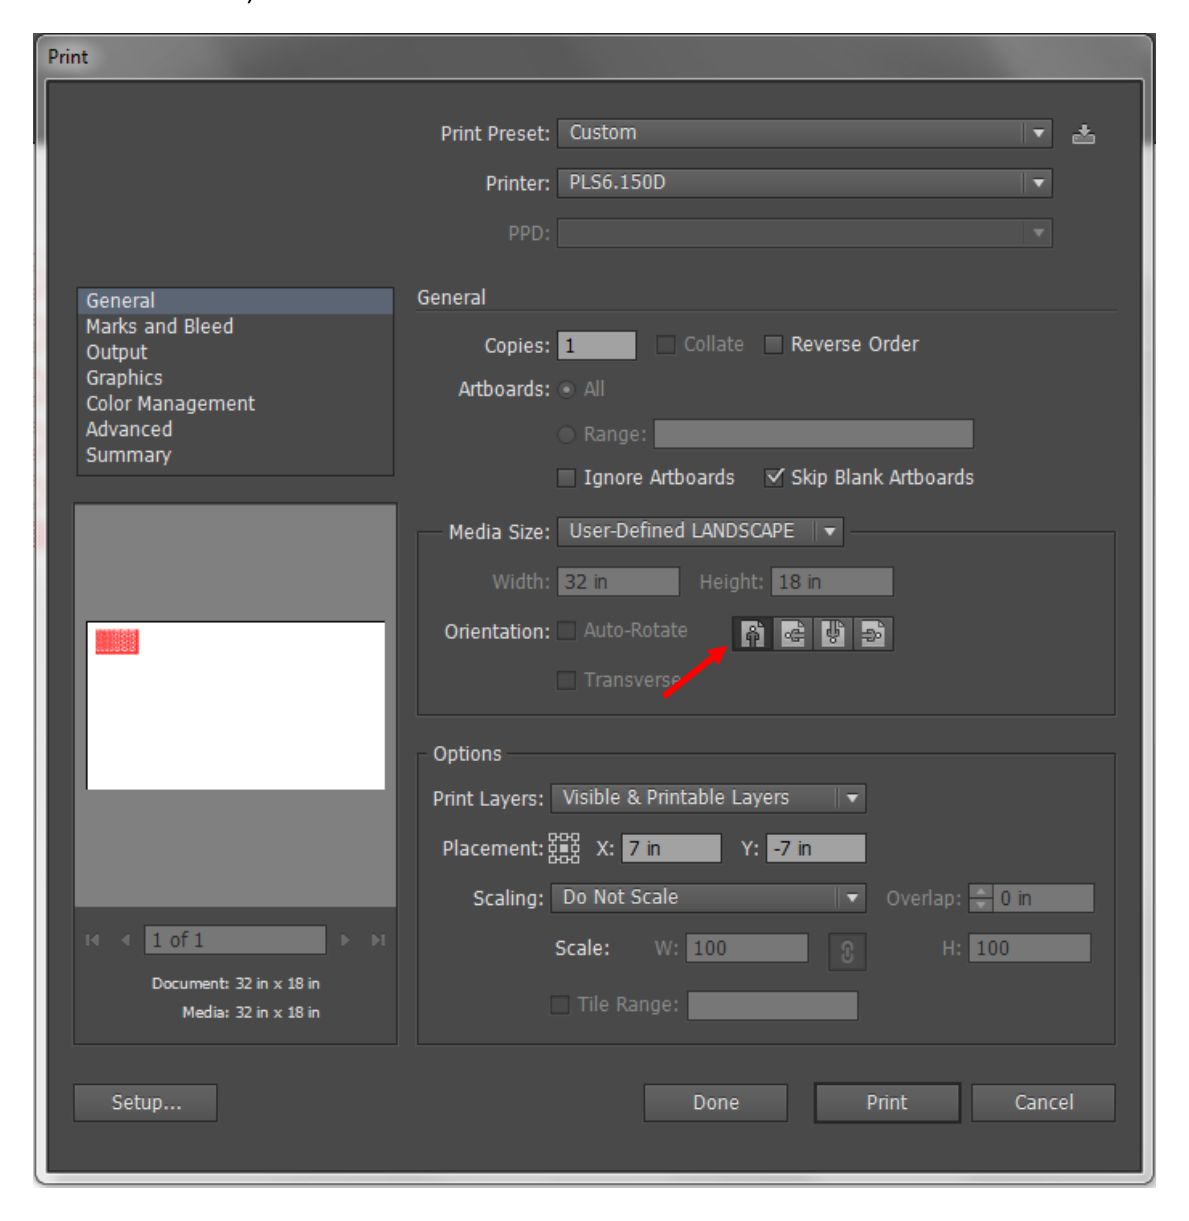 Figure 22: Click the first of the four Orientation buttons — portrait.
 -
Set the Placement PDF p. 15Under Options click the top left corner of the square in the Placement box.
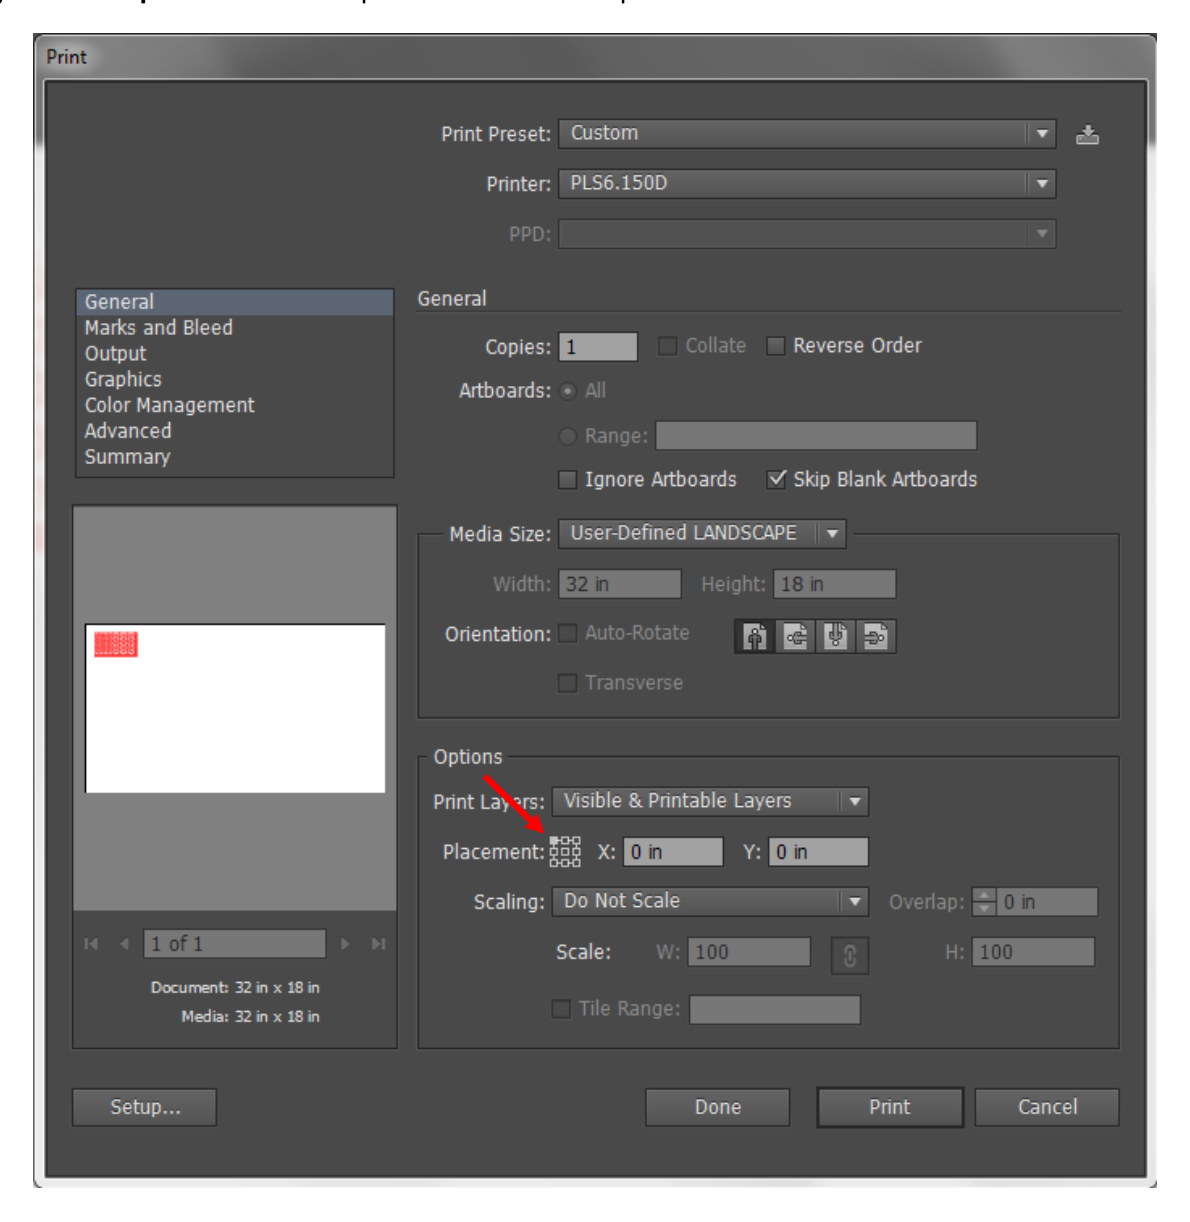 Figure 23: Placement, click the top left corner of the square.
 -
Send the File PDF p. 15Click the Print button at the bottom of the Print box. After a few seconds, you should see your filename on the screen on the control panel of the laser cutter in a format like “301 OF 301 MY CLASS PROJECT.” If you do not, ask a staff member for help.
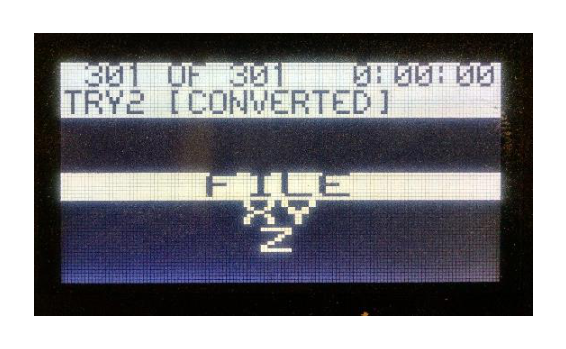 Figure 24: The filename appears on the control panel screen of the laser cutter.
Step 07
At the Laser Cutter
Load your material, open the Control Panel, and focus the machine before you run the file. Please ensure any ventilation systems that your system supports are on such as an exhaust fan or hood vent.
-
Load Your Material PDF p. 16Open the lid of the laser fully, making sure it does not drop when you let go of it, and place your material in the bed of the laser, making sureThat it lines up with the steel rulers on the top and left sides of the bed,That the height of your material will not interfere with the nose cone of the laser,That it does not hump up in the middle of the sheet or curl up sharply on the edges.Warning: All of these situations will cause the nose cone to catch on your material and ruin your work.
-
Open the Control Panel PDF p. 16Click the Universal Laser Systems Control Panel icon in the lower right corner of the screen to open the Control Panel. The Control Panel displays a virtual view of the laser cutter bed and allows for calibration and cut control.
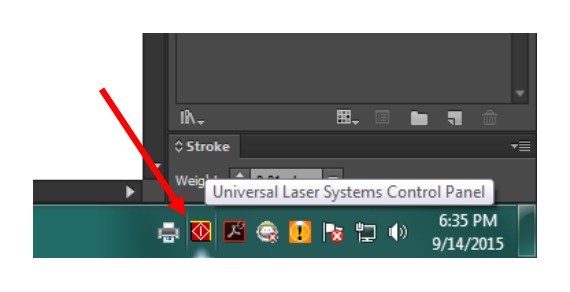 Figure 25: The Control Panel icon is in the lower right corner of the screen.
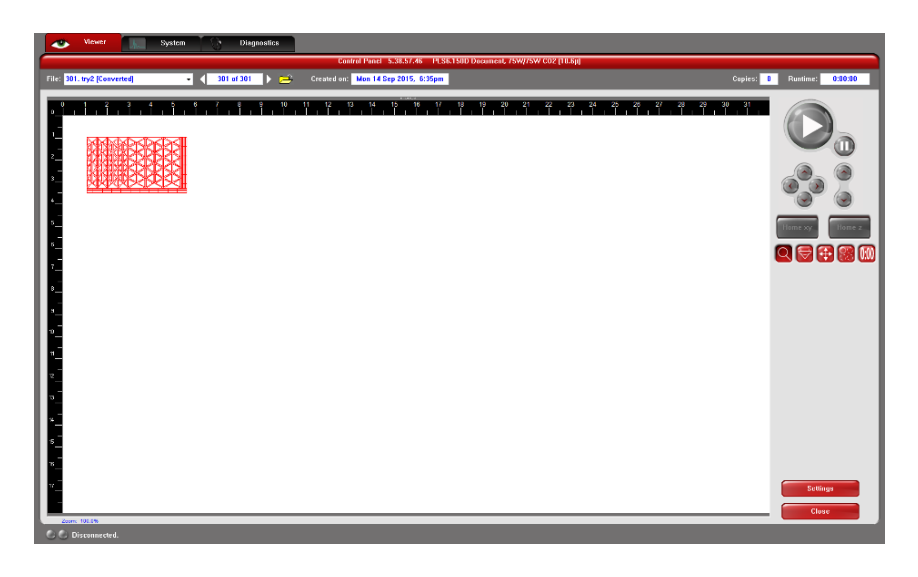 Figure 26: The Control Panel shows a virtual view of the bed and your file.
 -
Move the Focus Carriage PDF p. 17Click the Focus icon on the right hand side of the screen, then click on a location, near the middle, over your material. The laser focus carriage will move toward the location you clicked.
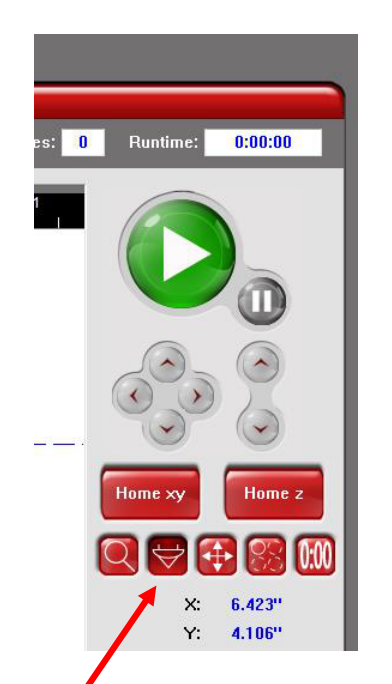 Figure 27: The Focus icon on the right hand side of the screen.
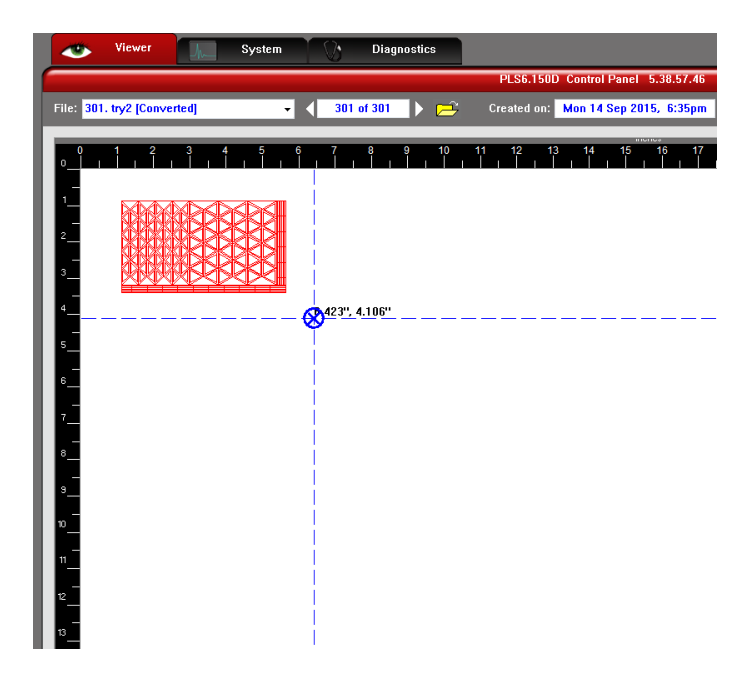 Figure 28: Click a location over your material and the carriage moves to it.
 -
Find the Focus Tool PDF p. 17Find the black and white plastic focus tool on the right-hand shelf inside the laser cutter.
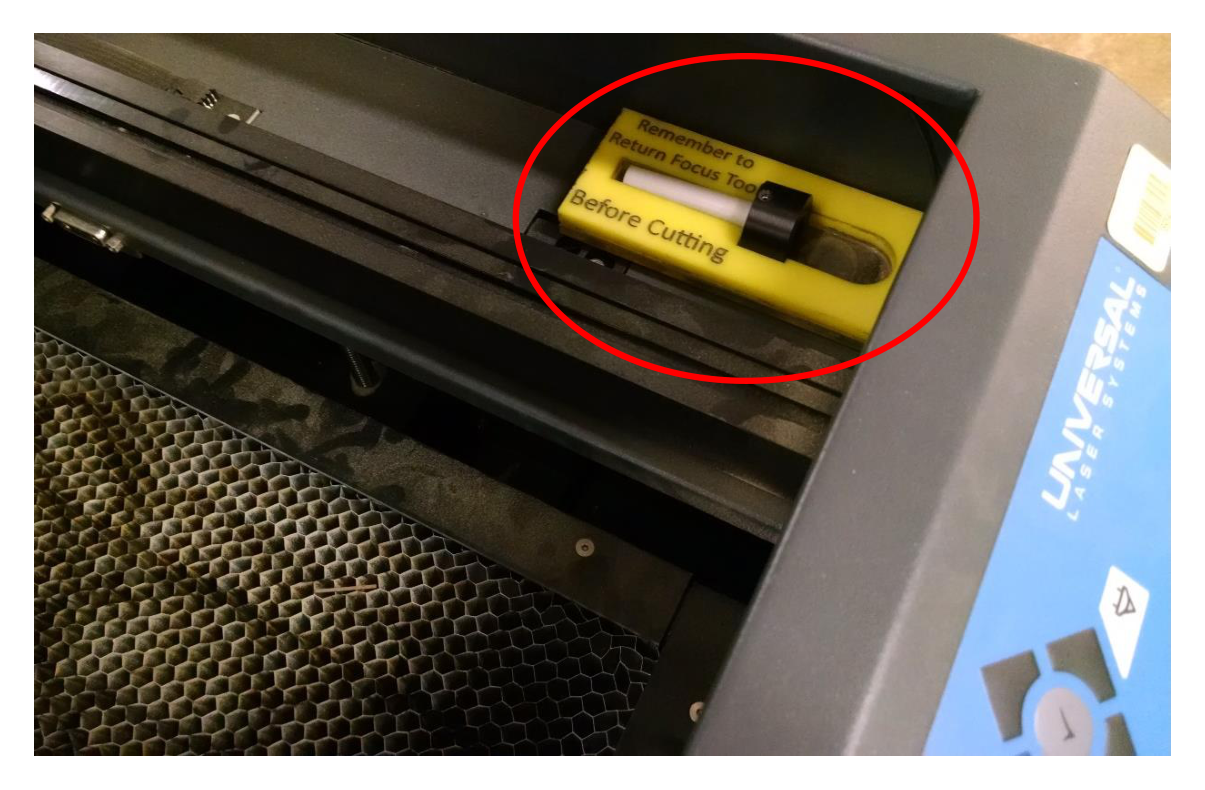 Figure 29: The focus tool lives on the right-hand shelf inside the laser cutter.
 -
Set the Focus Tool Against the Carriage PDF p. 18Place the focus tool on top of the material, near the laser focus carriage. On stations A and B, select Z from the machine menu. On stations C and D, no Z selection is needed. Raise or lower the bed using the UP and DOWN buttons on the machine so that the lower corner on the flat side of the focus tool rests against the lower front corner of the focus carriage.
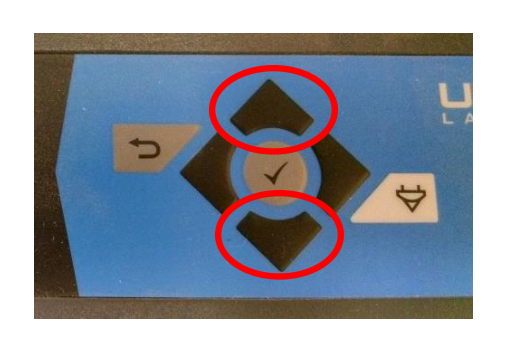 Figure 30: Raise and lower the bed with the UP and DOWN buttons on the machine.
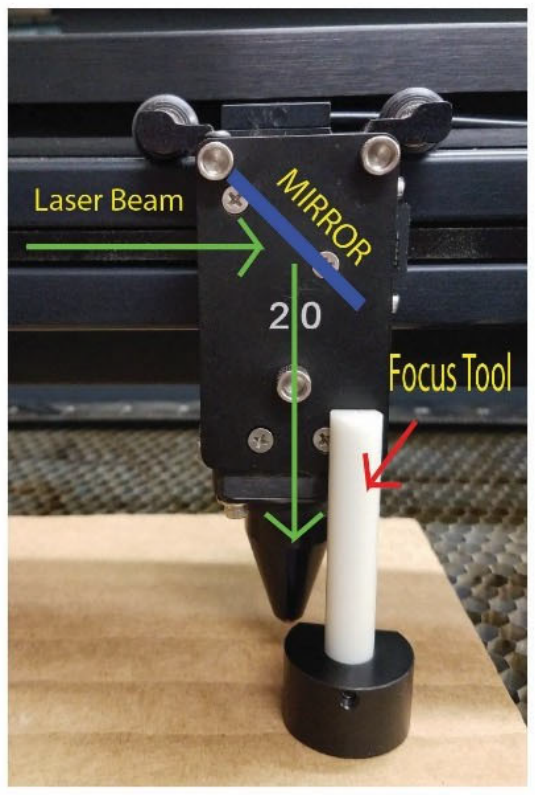 Figure 31a: The focus tool sits directly below the mirror, in the path of the laser beam.
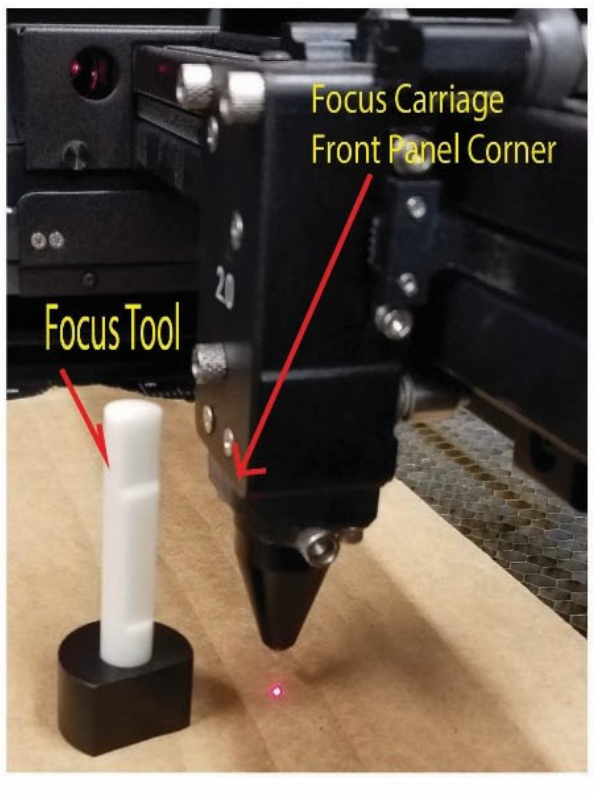 Figure 31b: The focus carriage front panel corner is your reference point for alignment.
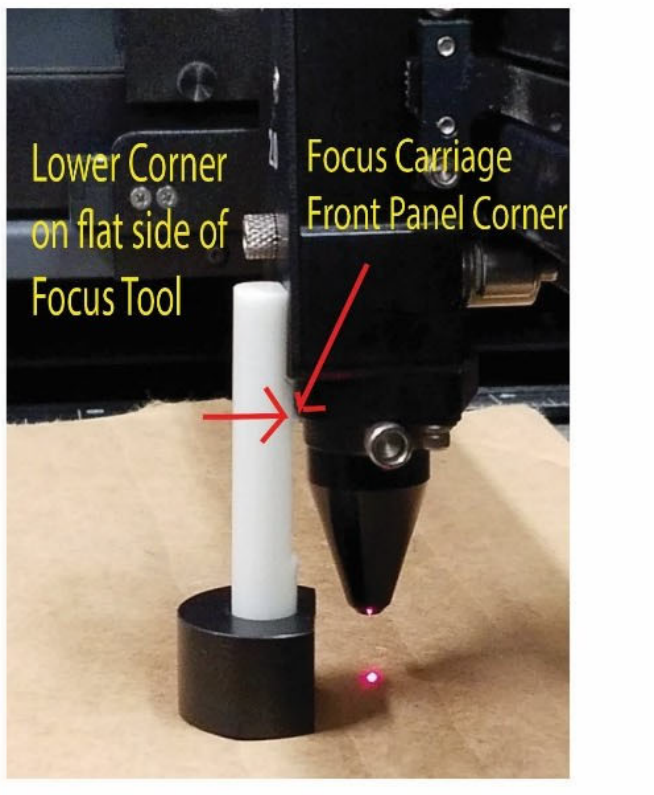 Figure 31c: The lower corner on the flat side of the focus tool rests against the lower front corner of the focus carriage.
 -
Fine Tune the Focus PDF p. 18Slowly raise the bed until the lower corner of the front panel on the focus carriage meets the bend on the focus tool. As you adjust the Z height up, you will see the focus tool start to tilt away from the focus carriage. Move the bed back down slightly until the tool sits perfectly flush with the front panel on the focus carriage. To see this accurately, you will need to view the focus carriage on the right side.Pro Tip for A and B: Press the Select (checkmark) button on the machine to change move increment per press of the UP and DOWN buttons.
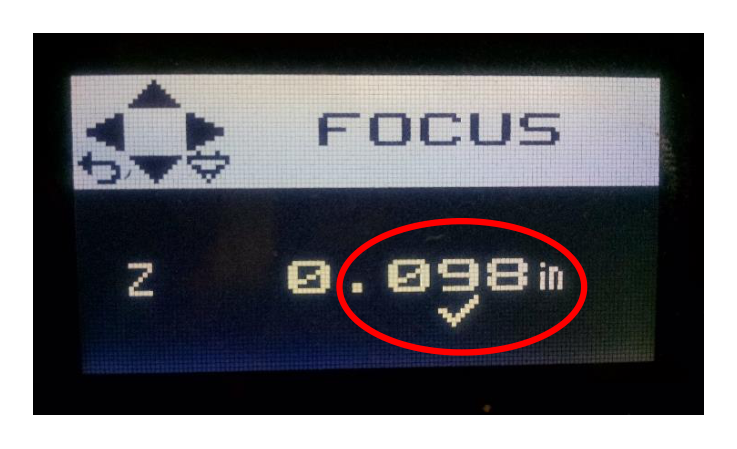 Figure 32: The machine display shows FOCUS and the current Z height.
 - Estimate the Cut Time (Optional) PDF p. 19Close the lid and confirm that the file appears in the control panel. Click the Time button, then click Start in the Estimated Job Completion Time panel to calculate the estimate. This is the time-estimation control shown below; the green Play button starts the actual cut.
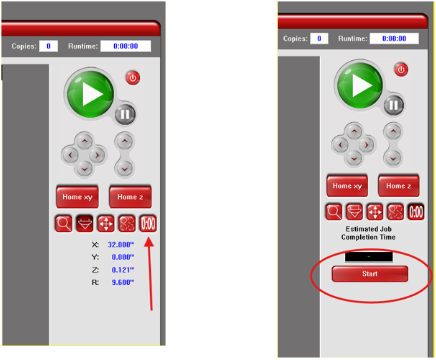 Time button and estimation Start control (PDF p. 19).
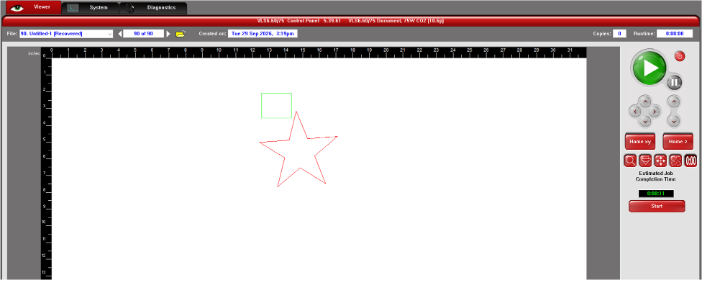 Example time estimate from PDF p. 19. Your file’s time will vary.
 -
Verify with the Attendant & Run the File PDF p. 19Close lid. See attendant so they can verify your settings and focus is correct. Then press the green Play button when ready.
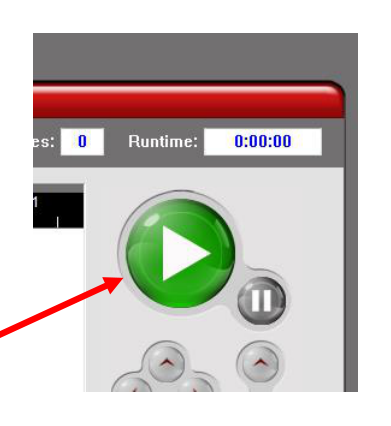 Figure 33: Press the green Play button when ready.
Step 08
Pausing & Tips
Supplemental guidance: This section retains additional advice from the original web SOP; it is not included in the PDF.
You can stop mid-cut to check your work, and a handful of habits will save you material and time. Just make sure that the cutter has stopped and you are also not directly looking into the machine without glasses until it returns back to its homing location.
-
Pausing Mid-CutIf you need to examine your work or clear loose debris or dust from your sheet while the file is cutting, press the Pause button on the machine firmly or use the Pause button in the Laser Control Panel on the computer. It will sometimes take a second or two, but the laser will stop cutting and park in the top right corner. You may now raise the lid of the laser and inspect your work. Take care not to shift the sheet of material you are cutting, or the rest of the file will be misaligned. When ready to finish cutting, close the lid and press the Play button, and the laser will pick up precisely where it left off.
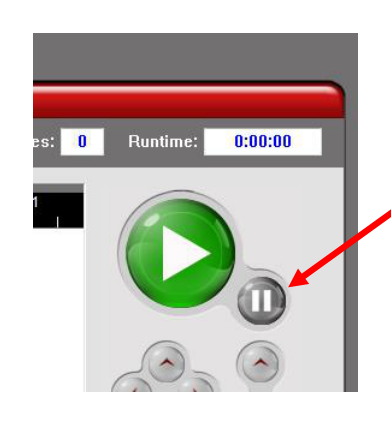 Figure 34: The Pause button in the Laser Control Panel on the computer.
Tips
Quick Reference
-
Nothing Happens When You Send the FileIf you send a file and nothing happens or nothing shows up on the Control Panel screen, check your color mode, check your stroke weight, and check your line colors. This fixes 90% of the problems.
-
Score With VectorsDon’t forget that you can score with vectors as well as through-cut. This is usually much faster than scoring with rasters.
-
Organize by Cut OrderFollow the PDF’s black-through-orange color order and its recommended assignments: black for raster engraving, blue for vector scores, and red for vector through-cuts. Plan engraving and scoring before through-cuts to avoid working on loose pieces.
-
Leave Yourself Enough TimePlan to complete your process over the course of a couple or several days, rather than in one. Bear in mind that the more complex your design, the lower your speed settings are, or the more rastered artwork you have, the longer you will need to cut your file. Laser Lab appointments are limited to 1 hour per day. If no one is scheduled after you, the lab attendant will let you stay until you are done. When the lab is busy, we can not guarantee you will be permitted to stay beyond 1 hour.
-
Split Very Large FilesIf you have a huge file that you know will take a long time to run, such as a sheet with hundreds or thousands of parts, you can divide it into several areas with a margin in between each, and output them as separate files. Doing this will allow you to pull your sheet off the laser while only partially complete and come back to finish your work later without having to throw your material away and start over.
-
Tabs & Bridges for Tiny PiecesIf you have very tiny pieces please use “tabs” or “bridges” on them: tiny gaps in the outlines of your pieces that leave them connected to your skeleton. The easiest way to do this in Illustrator is to simply make very small rectangles or circles with white fills and no stroke and position them over the perimeters of each shape in one or two spots. The laser will “see” a gap in your vector. As an added benefit, this allows you to quickly pick up your whole sheet and trim pieces off as you need them at your desk. This works very well for paper and cardstock, which is the biggest offender, but is slightly trickier when cutting acrylic.
-
Make a Test CutIf unsure about your settings, or still becoming comfortable with the laser cutter, make a small test cut either on a part of your sheet you will not need, or on a separate piece of scrap of the same material you’re using for your finished file. Its typically safer to not waste material, "measure twice cut once".